
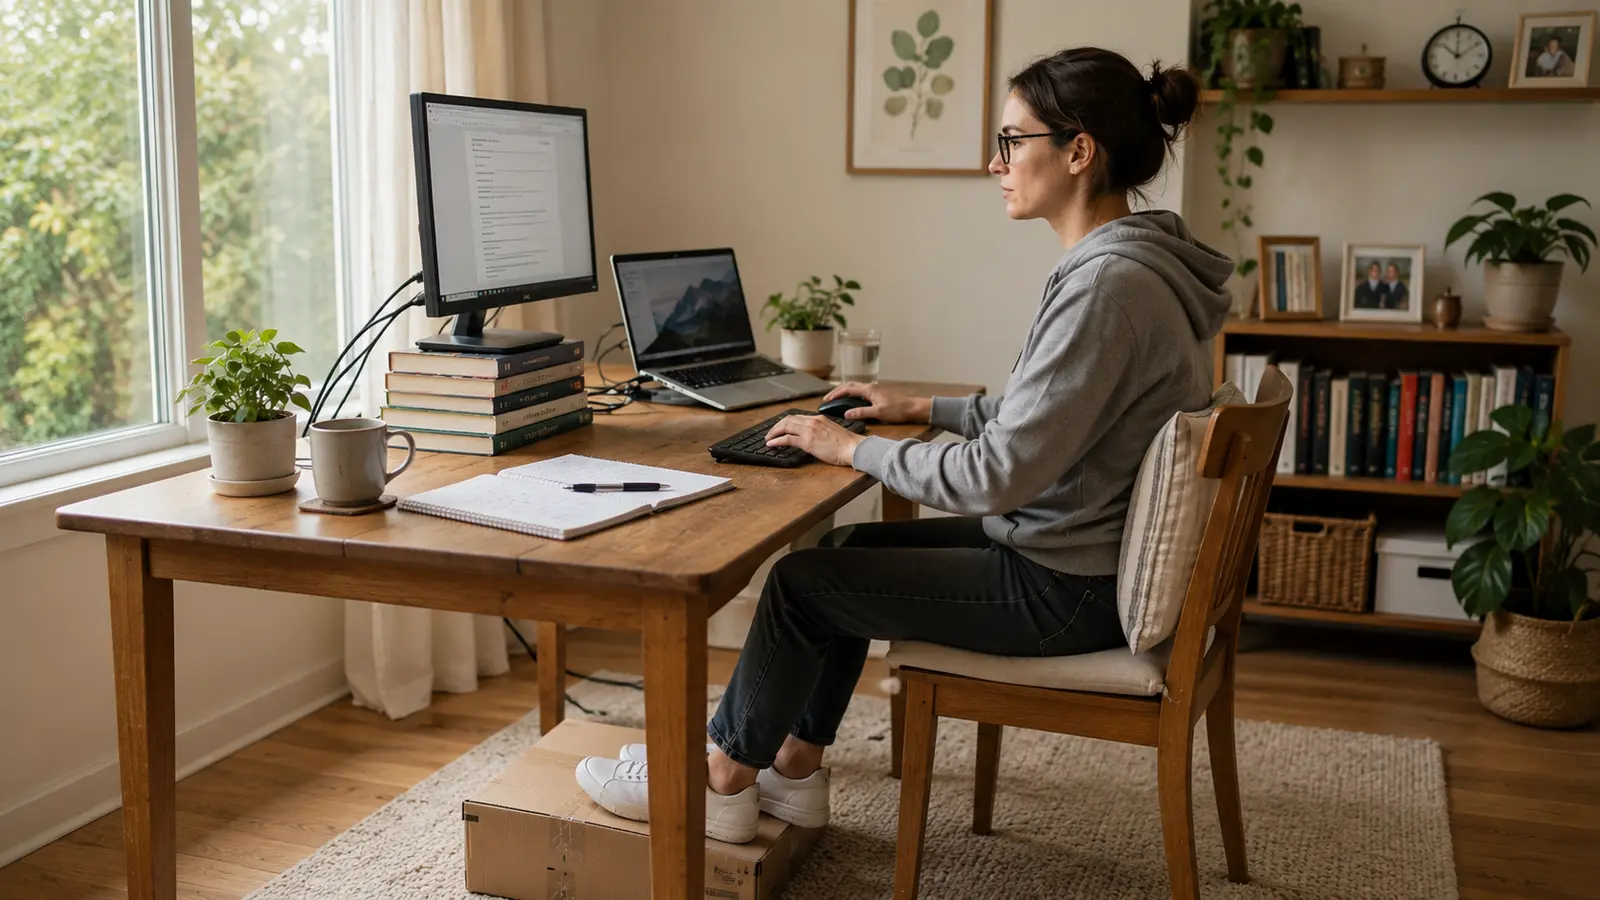
You can fix most home office ergonomic problems for free, with things already in your house, before you spend anything. Raise your screen so the top sits at eye level. Put a box or a stack of books under your feet so they stop dangling. Pull your chair in so your elbows rest near your body at a comfortable angle. Slide a cushion behind your lower back. These four moves solve the majority of neck, shoulder, and back complaints that come from working at a home desk. New furniture is the last step, not the first.
I learned this the slow, painful way. I spent years working from my bedroom on furniture that was never meant for a full workday, and my neck and back paid for it. I bought chairs that did not help. What finally worked was not a purchase. It was understanding which parts of the setup actually mattered and fixing them with what I had. This page is the map I wish I had at the start.
A quick, honest boundary before we go further: I am not a doctor and not a certified ergonomics specialist. Everything here is general setup guidance drawn from lived experience and from reputable sources like Mayo Clinic and OSHA. It is not medical advice. If you already have persistent pain, numbness, or tingling, please stop improvising and see a doctor or a physical therapist. A blog cannot diagnose you, and this one will not pretend to.
The one idea that changes everything: fix position, not products
Almost every article you will find on this topic quietly assumes you are about to buy something. A chair, a desk, a stand, a footrest. That framing is backwards for most people. The thing hurting your neck is usually not the absence of a product. It is the position your body is holding for eight hours.
OSHA describes the goal as a neutral body position: joints naturally aligned, muscles relaxed, nothing reaching or craning. When your body sits in that neutral posture, the strain on your muscles, tendons, and joints drops, and so does your risk of the aches that build up over weeks. The good news is that you can reach a neutral position on furniture you already own by adjusting where things sit. That is what the rest of this guide walks through, zone by zone, from the screen down to your feet.
Work through the zones in order. Each one builds on the last, and most people feel a real difference after fixing just the first two.
Zone 1: Screen height and distance
This is the fix with the biggest payoff, and it costs nothing.
If you spend the day looking down at a screen, your neck holds your head forward for hours, and that is where a lot of “I ache by 4 p.m.” pain comes from. The fix is to bring the screen up to you instead of bending down to it.
Mayo Clinic’s guidance is simple and worth memorizing: place the monitor directly in front of you, about an arm’s length away, with the top of the screen at or slightly below eye level. (If you wear bifocals, lower the screen another inch or two so you are not tipping your head back to read through the bottom of your lenses.)
Free household fixes:
- Raise a monitor by setting it on a couple of hardcover books, a ream of printer paper, or a sturdy shoebox until the top of the screen reaches eye level.
- Distance check: sit back and reach out. Your fingertips should roughly touch the screen. That is about an arm’s length.
- Straight ahead, not to the side: the screen should be centered in front of you so you are not turning your neck to work.
If you use a laptop, this zone comes with a catch that deserves its own section further down, because raising a laptop screen creates a new problem for your hands. Hold that thought.
Zone 2: Keyboard, mouse, and your elbow angle
Once the screen is up, look at your arms. Reaching forward or up to type pulls on your shoulders and forearms all day.
OSHA’s neutral-posture guidance is a clear target: keep your elbows in close to your body, bent somewhere between 90 and 120 degrees, with your shoulders relaxed and your upper arms hanging naturally at your sides. Your wrists and forearms should be roughly straight and parallel to the floor, not bent up or cocked to the side.
Free household fixes:
- Pull the chair in. Most people sit too far back and reach for the keyboard. Move closer until your elbows can hang at your sides.
- Drop the keyboard, not your shoulders. If your desk is high and your shoulders creep up toward your ears to reach it, the desk is the problem, not your posture. There are free ways to work around a too-high desk, covered in the desk zone below.
- Keep the mouse next to the keyboard, at the same height, so you are not stretching sideways for it.
Zone 3: The chair and your lower back
You do not need an expensive chair to sit well. You need the seat at the right height and some support behind your lower back.
Mayo Clinic’s rule for chair height: adjust it so your feet rest flat on the floor and your thighs sit roughly parallel to the floor. If the chair has armrests, set them so your arms rest gently with elbows close and shoulders relaxed, not shrugged up.
The lower back is where most cheap chairs fall short, and it is also the easiest thing to fix for free.
Free household fixes:
- Lumbar support from a cushion or rolled towel. Place a small cushion or a rolled-up towel in the curve of your lower back so your spine keeps its natural inward curve instead of slumping into a C shape.
- Firm up a too-soft seat with a flat cushion so you are not sinking below the right height.
- Set the height by your elbows and feet, not by how it feels at first glance. Height that lets your feet sit flat and your elbows reach the keyboard is the right height.
A plain, non-adjustable chair can be made a lot more comfortable with nothing but a towel and a cushion. There is more you can do to a basic chair without replacing it, and it has its own walkthrough: how to make a cheap chair more ergonomic.
Zone 4: Your feet
This zone gets skipped constantly, and it undoes the chair fix if you ignore it.
Here is the trap. When you raise your chair so your elbows meet the desk, your feet often stop reaching the floor. Dangling feet put pressure on the backs of your thighs and pull your posture out of neutral. Both Mayo Clinic and OSHA are explicit that your feet should be fully supported, either flat on the floor or on a footrest if the desk height will not let your feet reach.
Free household fixes:
- A footrest from a box. A sturdy cardboard box, a thick book, a ream of paper, or a small stool under your feet does exactly what a store-bought footrest does.
- Aim for support, not a specific angle you have to measure. Your feet flat, your thighs supported, no pressure on the back of your knees.
If your feet do not reach the floor at your current desk, that is a common and fixable situation, not a sign you bought the wrong chair. The full walkthrough is here: what to do when your feet don’t touch the floor.
Zone 5: Lighting and glare
The last zone is about your eyes, and it is often the reason for late-day headaches that people blame on their posture.
OSHA points to glare on the screen as a real source of visual strain. Glare makes you lean in, squint, and crane your neck to see around the reflection, which quietly wrecks the good posture you just built in the zones above.
Free household fixes:
- Move the screen so windows are to the side of it, not directly behind it (which forces your eyes to fight a bright background) and not directly in front of it (which throws a reflection onto the screen).
- Angle the screen slightly to kill any reflection you can see from overhead lights.
- Give your eyes regular breaks. Eye-care groups such as the American Optometric Association commonly recommend the 20-20-20 rule: every 20 minutes, look at something about 20 feet away for about 20 seconds. It costs nothing and resets the muscles you have been straining.
The desk itself: too high, too low, or a dining table
Desks are the zone people assume they cannot fix without buying, and that is usually wrong.
A desk that is too high pushes your shoulders up and your wrists into a bad angle. A desk that is too low makes you hunch. Most home desks are a fixed height, but the surfaces around your keyboard and your feet are things you can change for free. Raising your chair and adding a footrest can turn a too-high desk into a workable one. The complete method is here: how to fix a desk that is too high.
The dining table deserves a special note, because a huge number of home workers use one, and it is almost always too high for typing. Kitchen and dining tables are built for eating, not for keyboards, so your elbows end up above a neutral angle. If that is you, start here: dining table office ergonomics.
What nobody selling you gear will say
This is the part most articles leave out, because most articles are trying to sell you the chair, desk, or stand they just recommended. Three honest things:
1. You genuinely do not need expensive equipment to be comfortable. The zones above get most people to a neutral, low-strain setup with books, a box, a towel, and a cushion. The single most valuable thing is not a product. It is putting the screen at eye level and your feet on something solid. Do those two first and judge how you feel before spending anything at all.
2. A laptop-only setup forces a bad compromise, and one cheap fix solves it. Here is the problem raising a laptop creates. Lift the laptop so the screen is at eye level, and the keyboard goes up with it, which wrecks your elbow and wrist angle. Keep the keyboard low, and the screen stays low, which wrecks your neck. On a laptop, screen height and keyboard height fight each other, and you cannot win both at once. This is the one place where a small purchase earns its keep for most people: an external keyboard (and ideally a mouse) so you can raise the laptop screen to eye level while your hands stay low at a neutral angle. If you buy one thing this year, that is the highest-value cheap fix in this whole guide. Everything before it can be free. This one usually should not be.
3. Persistent pain needs a professional, not a blog. Every fix on this page is about position and comfort for a healthy body working at a desk. None of it is treatment. If you have pain that does not ease after a day or two of a corrected setup, or numbness, tingling, or a specific sharp pain, that is your signal to stop tinkering and see a doctor or a physical therapist. Getting your desk right can prevent a lot of everyday aches. It cannot diagnose or treat an injury, and I would be doing you real harm to imply otherwise.
The order to fix things, if you can only do one thing this week
If it all feels like a lot, do it in this order, one item at a time:
- Screen to eye level (free, biggest neck payoff).
- Feet supported (free, protects your posture and lower back).
- Elbows in at a comfortable angle (free, pull the chair in).
- Lower-back support (free, a towel or cushion).
- Kill the glare (free, move the screen relative to windows).
- Then, and only then, consider spending, starting with an external keyboard if you work on a laptop.
You will likely feel the first two within a day. That is the whole point of this site: fix what you already own, before you buy anything.
Every fix in this cluster, in one place
This page is the overview. Each of the guides below goes deeper on one part of the setup, and none of them asks you to buy anything first.
Start here, if you do not know where your problem is
The chair you already have
- How to make a cheap chair more ergonomic
- Every lever on your chair, and what it actually does
- Lumbar support: what a rolled towel does and does not do
- Armrests: too high, too low, or better off removed
- Seat depth: the adjustment almost nobody knows about
- A chair with no height lever at all
- Hand-me-down and borrowed furniture: what you can actually salvage
The desk, and the height problem
- Your desk is too high and you cannot lower it
- Your desk is too low, which nobody writes about
- When your feet do not touch the floor
- Footrest vs books vs raising the chair
The surface you ended up working at
- Working from the dining table without wrecking your back
- The kitchen counter office: standing by accident
FAQ
Does posture really matter this much, or is it overblown?
It matters, but not in a dramatic, one-bad-day way. The issue is repetition. Holding your head forward or your shoulders shrugged for hours, day after day, is what builds up into neck, shoulder, and back aches. Reputable sources like OSHA frame the goal as a neutral position that lowers that steady, cumulative strain. The fixes are small; the payoff comes from doing them consistently.
How fast will I feel a difference after fixing my setup?
Many people notice less end-of-day neck and shoulder tightness within a day or two of getting the screen to eye level and their feet supported, because those two changes take real load off the body immediately. Deeper habits and any built-up tightness take longer. If a corrected setup brings no relief at all after a few days, treat that as a reason to check in with a professional.
What if none of these fixes match my situation?
That is common, because home setups vary so much: a dining table, a soft couch, a chair that is too high, feet that will not reach. The specific-situation guides linked through this page (the dining table, the too-high desk, the cheap chair, the feet that dangle) go deeper than a single pillar can. Start with the one that sounds like your desk.
Do I need an ergonomic chair to work from home safely?
No, not to start. A basic chair set to the right height, with a rolled towel or cushion for lower-back support, gets most people to a comfortable, neutral seated position. A dedicated ergonomic chair can be worth it later, especially for very long days, but it is an upgrade, not a requirement, and it should not be your first move.
Is it safe to keep working on a laptop all day?
It is workable, but a laptop alone forces a compromise: you cannot have the screen at eye level and the keyboard at a neutral hand height at the same time, because they are attached. Raising the screen and adding a separate external keyboard resolves that. That is the one small purchase this guide actively recommends for regular laptop workers.
This article is general home office setup information, not medical advice. It draws on guidance from Mayo Clinic and OSHA as cited. If you have persistent pain, numbness, or tingling, see a doctor or physical therapist.